Tuesday 6 October 2015

Spooky Halloween - Scrapbook Page Ideas

With Halloween just around the corner, I was inspired to create a spooky digital paper and clipart set. These occasions always inspire me to get creative, however I always wake up a little late and with a few more ideas inside this head of mine, I hope I can create a few more sets for you! :-)


Above are a three ideas using my new Spooky digital set available at my Etsy shop , the set has 12 digital scrapbook pages, which are 12"x12" and saved as high resolution jpeg files, plus 63 clipart images of various sizes saved as PNG files with a translucent background.

Hopefully these simple pages will inspire you to get creative and I would love for you to share your ideas/projects, using my Spooky Halloween Set, on my facebook page.


Friday 19 June 2015

DIY Party Decor - Baby Blocks Free printable download and how to make details - Cute Baby Shower Idea


These oh so cute baby blocks are a fun party decor idea or party favour box for your friends baby shower.

Click Here
For the Free 3 page PDF download, each A4 page fits two 40x40mm block templates
Use one colour option or all three.

What You will Need:
1. Home Printer
2. A4 Paper or Card
3. Scissors
4. Bone Folding Tool 
5. Double sided tape or glue
(I prefer double sided tape)


Follow this easy step by step guide to make your free party decor

1. Print preferred pages onto A4 paper or card and cut around edge.

2. Score the cutout template on the dotted lines with bone folding tool then fold to make block.

3. Apply glue or double sided tape to side tab near "Y" as seen in pic 3 and line edge up.

4. Fold top and bottom panels in, you can use glue or double sided tape on the tabs to secure the block.


And there you have a cute block to decorate your baby shower party table or use as a party favour box.

You can also purchase matching DIY printable decor or invitation at my Etsy Store.


Monday 18 May 2015

Wedding Invitations +

I know I have been extremely quiet for about a month now, but that is because I went on a sunny holiday to Durban, South Africa. It was so lovely to see my family & friends, who I haven't seen for 18 months! The occasion: My sisters wedding! :-)
She looked so amazing and alot of fun was had by all!

As a wedding gift to my sister and her now husband, I made their wedding invitations and menu's, etc (See pics)
You can contact me if you would like me to make you some stunning wedding invitations or other wedding accessories.
tanyalaportedesigns@gmail.com / mobile: (+61) 481268036


Thursday 2 April 2015

Gorgeous Gift Box Purse - Free Printable Download

Another free printable download - Yay! - and isn't it gorgeous!
This gift box purse is the perfect size for little gifts like jewellery, nail polish, trinkets, etc and is fairly easy to make.
When you read through the "How to make" and look at the pictures it may seem a bit daunting at first but once you get started, you'll find it is easier than it looks. 


For the Printable 
PDF Download


WHAT YOU WILL NEED:

1. Home Printer or Local Printshop.
2. A4 sheet of white card.
3. Double sided tape
4. Scissors
5. Ribbon
6. Bone Folder Tool

HOW TO MAKE:

1. Print the pdf onto an A4 sheet of white card.
2. Carefully cut around edges.
3. Punch two holes into the tab

It should look like this once trimmed. 


4. Use bone folder tool to score the card as per the diagram below, do the straight easy edges 1st.
5. Then you will need to score an upside down "Y" on the side panels of the gift box.
  • Start by doing a score line down the centre of the panel about 7/8 of an inch in from the side, the line should only be about 2 3/4" long.
  • Now score a diagonal line from the bottom of this line to the bottom left of the side panel, and another diagonal line from the bottom of the centre line to the right bottom corner of the panel.
This could get a little tricky but if you follow the below pictures slowly and carefully all will be perfect! :-)


There you go not to bad.

6. Now fold in all the tabs and sides.


7. Apply Double sided tape to the small tab on the right (You'll notice mine is a little narrower than yours - the wider tab should make it easier for you to work with,)
8. Now stick the back of the left side to the front of the tab where you have just applied the tape, lining up the edge neatly. You should have the beginnings of a rectangular box.
9. Fold the sides as per the upside down "Y" you scored. (I did this at the end but I think it will be easier to do it now before you stick the base.)


10. Fold in the smaller bottom side tabs of your gift box .
11. Now fold down the base tab from the front of your gift box.
12. Apply double sided tape to the bottom edge of the base tab, as per below.
13. Stick together being careful to line up the left and right edges.


14. Fold down you top tab (purse lid) and use a pencil to mark where you need to punch holes on the front of your gift box.


15. Punch holes into front of gift box, now thread ribbon through from the inside of your box.


16. Insert your gift.
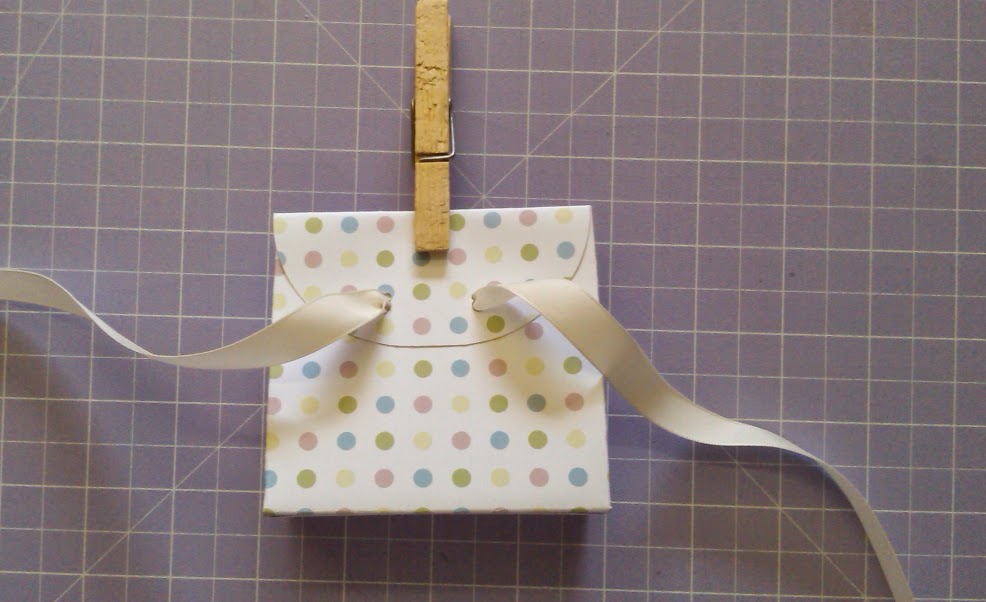
17. Fold down the top/lid of your gift box, thread the ribbon through your top punched holes.
18. Now tie the ribbon, I used a wooden clothes peg to hold the lid together while I tied the ribbon.


Your Gorgeous Gift Box Purse is complete!! 
I think it is very pretty and will be sure to put a smile on the receivers face.


Thursday 26 March 2015

My 1st Book Illustrations

I had to share my excitement, I finally received a few copies of the 1st childrens book I have illustrated. It took a long time to complete and it was a lot of hard work but I am very happy with the finished product. Below are some pics of a few pages.


This delightful childrens book was written by Kendra Vallone Matthews as a surprise gift to her father, who by the way, will only see it next week for the 1st time. ;-)

It is a story of a little boy who goes to visit his gran with an empty milk bottle, along the way he discovers a number of different, creative uses for his bottle.

You can purchase this book through Amazon and it will soon be available at popular book stores, please see the link below
http://www.amazon.com/Boy-Bottle-Kendra-Vallone-Matthews/dp/150764048X/ref=sr_1_1?s=books&ie=UTF8&qid=1427326423&sr=1-1&keywords=The+boy+and+the+bottle

Monday 23 March 2015

Free Printable - Colour and craft Easter Basket

I am still struck with Easter fever and created a fun easy to make Easter Basket. It is a colouring file so I could try out my new Copic Markers, as you can see I still need a bit of practice with them but enjoyed colouring regardless. 

Follow the link below to download your free printable colour and craft Easter Basket.
https://www.dropbox.com/s/20wpf8zvz0my553/Easter%20Basket.pdf?dl=0


WHAT YOU WILL NEED:

1. Home printer or local print shop
2. A4 sheet of card preferably
3. Scissors
4. Colouring crayons, pencils, etc.
5. Glue or double sided tape.
6. Bone folder tool but you can use the rounded back of a butter knife if you don't have one.


HOW TO MAKE:

1. Print the page and colour in.
2. Cut around the outline, being careful not to cut off the tabs.


3. Use bone folder or butter knife to score the base folds and the tab folds.
4. Lightly fold basket. 


5. Put glue or double sided tape onto the tabs.


6. Bring sides together lining up the edges.


7. There you go the base of the basket is complete, now for the handle. 


8. Put glue on one side of the handle.


9. Lie the basket on it's side then attach the handle to the top centre of the large Easter egg.


10. Now glue the other edge of the handle and attach to the other side of the basket.
11. Done your Easter basket is complete. 


Hope you enjoy creating this fun Easter project!


Monday 16 March 2015

Sweet Winter fabric

This is a sweet fabric I created some time ago for the Spoonflower penguin challenge (14 Jan 2015), I think it is too cute not to share, if you love this fabric pattern as much as I do please visit my Spoonflower shop to purchase. My sewing skills are not the best so I would love for you to share your finished sewing projects using this fabric, with me.